Frameworks: The cause of and solution to all your problems.

When new frameworks come out, people can really jump on the “kool-aid” train. I have had many developers and managers tout the greatness of a new framework. It’s solves many of our problems! It’s super simple! It’s really fast! Look at how beautiful and clean the code is! OMG I’M GOING TO CRY IS IS SO AWESOME!

I don’t want to get down on passionate programmers. I’ll take a passionate person over a non-plussed developer any day. Besides, all developers work in imperfect environments. We also tend to be very particular about development. When we work on a problem and there is no “thing” to truly complete it well, we typically have to work with little imperfections that bother us. After months or even years of work it’s a total relief to find an “amazing” framework that does “scratch that itch.” It’s a joyous moment in our technical, nuanced world.

So this new framework is shared with other developers. And they didn’t feel the pain with the current implementation. They don’t feel the need to abandon with no regard to this new panacea. And then when they see the syntax of the new “thing”, it doesn’t look so nice. In fact, it looks rather bothersome the way that they pass the state over to computation thing.

The better that a framework is, the more that it typically does. Most frameworks allow us to remove all of the boilerplate code and get down the the unique part of your project. And the more that it does, the less you really know what it is doing. But that’s ok! This thing is AMAZING!

Why testing here matters

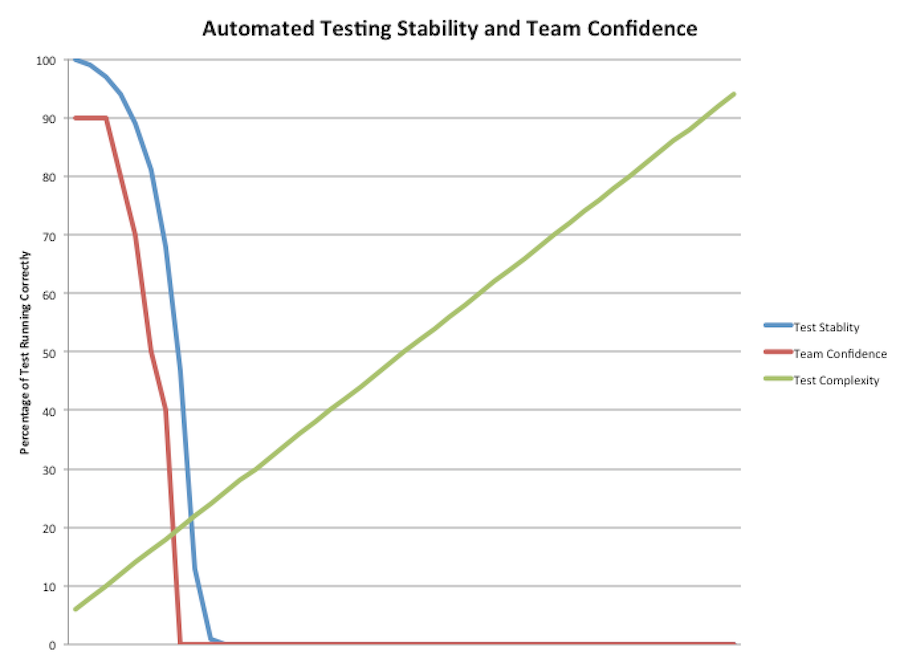
Testing a framework is important because we are going to need to use it. Plus since it is so awesome, it is going to be the underlying part of what we do. Maybe your business is selling shower curtain rings. Now you want to do it online and this “Ruby on Rails” framework is going to allow you to do it. The rails framework is going to underpin everything. Sooo… it should work properly.

The second you start working with a framework, you are doing integration coding. Your unit tests will become less and less useful. You will find yourself mocking everything. You might try to create the thinnest possible integration layer. Maybe you even venture into the black magic of partial mocks. Any way you slice it, you have a little code sitting on a small mountain of someone else’s work.

The ideal situation is a framework that shows you how to write integration tests. You need to be able to quickly setup a portion of the framework with your extensions and verify the output. Ideally, this starts up quickly ( < 100ms ) and gives you the verification that that your use of the system provides the expected output.

I’ll give you an example. In the Java world, there are two popular web MVC frameworks: SpringMVC and Jersey. These two frameworks solve the problem of handling REST calls. They allow your map rest calls to a function and translate the outputs to a web format (JSON/HTML…). I’m not going to go into the merits of either except for testing. Here is the code below for a test that accepts a GET call for a user and returns a user JSON object (translated from a POJO).

The Jersey implementation:

public class SimpleResource {

  @GET
  @Path("/get/things")
  @Produces(MediaType.TEXT_PLAIN)
  public String getThings() throws IOException {
      return "resource response";
  }
}

The SpringMVC implementation:

public class SimpleController {

  @RequestMapping(value = "/get/things", method = RequestMethod.GET, produces=MediaType.TEXT_PLAIN)
  @ResponseBody
  public String getThings() throws IOException {
      return "controller response";
  }
}

Both are fairly similar. Not too bad. Now let’s look at the tests.

The Jersey Test:

  public class SimpleTest extends JerseyTest {

    @Override
    protected Application configure() {
        return new ResourceConfig(SimpleResource.class);
    }

    @Test
    public void test() {
        String response = target("/get/things").request().get(String.class);
        assertEquals("resource response", response);
    }
}

The SpringMVC Test:

public class SimpleControllerTest {

  @Test
	public void simple() throws Exception {
    standaloneSetup(new Controller(mockedService)).build()
			.perform(get("/get/things").accept(MediaType.TEXT_PLAIN))
			.andExpect(status().isOk())
			.andExpect(content().contentType("text/plain"))
			.andExpect(content().string("controller response"));
	}
}

Both testing frameworks will allow you to build a very detailed request that is sent into the application using REST. We can set the HTTP method, the path, and headers.

The difference between these two examples is that SpringMVC has created an entire framework that will inspect the response. The Jersey testing framework will allow you to get the response body. The interesting part about the Jersey testing framework is that it was really created just to test the framework internally:

Jersey Test Framework originated as an internal tool used for verifying the correct implementation of server-side components

What we lack here that is possible with the SpringMVC framework is the full ability to assert the response. It’s also interesting that the top stack overflow question: “Unit testing jersey Restful Services” has the top answer being to use RestAssured (A generic API testing framework). Jersey isn’t a bad project. It’s really nice and very fast. My concern is that I am limited in verifying how it will work using fast integration tests.

Ok…. So Who Cares!?! It’s Just testing!

Automated testing is important. If don’t agree or hesitate to agree, then I’ve already lost my case. When I have brought in a new framework, I have three options when using it:

  1. Let’s verify how it works through integration testing.
  2. Let’s open up the source code and read through it.
  3. Let’s tell ourselves after it’s in production: “Other people use it”, “It seemed fine.”, “That’s what we pay our QA folks for.”, “I saw it on [hacker news]/[Some conference]/[youtube] and it should work fine.”

I think option one is the best. It provides a safety net for upgrades, understanding the framework (and your code). It safely allows other people to transition onto your team and guides them in how the application works without weeks/months/years of understanding.

Option two is valiant but many times you want the framework to solve a boilerplate or difficult problem for you. So the thought of understanding how this framework handles connection pooling or SSL or whatever gets you confused. If you are lucky enough to have a core contributor to the project on your team then that is great, but your bus factor is 1.

The last option is dumb. I’m not gonna sugar-coat this bad boy. The probability of failure goes up and what’s worse is that you will find it late in your project. I don’t ever want to work on a project that doesn’t have tests. I’m not a QA nut, I just don’t want to do support!

Elastic Search and Docker

Elastic Search is great! Docker is great! Let’s use both of them together! Ok, seriously. I am working on project that is using a fairly large Elastic Search (ES) cluster. More than just a toy example. So we have nodes that run on different machines in different racks and in different datacenters. So the examples (here, here, here, and here) talk about some really great stuff but I couldn’t get them to really work with separate ES nodes. Maybe too, you are running in the cloud and have a nice plugin to use for your cloud provider. Ok, I don’t have that.

The problem.

Well, it lies in the fact that docker networking hides the containers from the networking stack on the host machine. The problem is that when you start elastic search, you have to host addresses:

  • The bind host
  • The publish host

The bind host is where we declare where we want the process to serve from. This allows us to define which network interface(s) we want to use. It is the basic requirement for a server process to listen to tcp traffic.

The publish host is like the “return address”. When we use the zen discovery with ES, we have to tell the other nodes how to talk to our node. They have important things to tell us and two-way communication is good.

The problem that arrises is that most of the documentation points to this nice parameter network.host (yep, the first parameter in the network documentation). The “cool” (or not) feature of this parameter is that it will set both the bind and publish host for you (source) And it has an even nicer thing where you can set it to 0.0.0.0 which tells ES, “hey, choose a non-loop back interface and just use that!” This shows up in the configuration for the official ES docker container!

Thhe problem hits us when we realize that the IP address in the docker container is not the same IP address that other processes outside of the server can see. Now, there is the GIANT HAMMER solve this. You can add the parameter --net="host" to your docker run command, but that is generally a bad idea (see here, and here).

So it took me some time to realize that I want to set my bind host to the “fancy pants” 0.0.0.0 and then set my publish host to the hostname of the host (or the IP address of my host). Since my docker container doesn’t know much of anything about the host, I have to tell it what is the external host. I do this as part of my docker run command; I add an environment variable --env "PUBLISH_IP=10.0.0.1". Then in my elasticsearch.yml, you have to set the following:

network.bind_host: 0.0.0.0
network.publish_host: "${PUBLISH_IP}"

Adding these two lines will allow you to have your ES containers talk to each other properly. Man, it feels kinda anticlimatic to have a solution that is so small.

Nothing big, but I hope you found this before too much hassle.

The moment that you QA group figures out how to write end-to-end tests or the moment that you boss watches a selenium test, a new fever hits your team to write a test as solution to every problem. Button the wrong color? Write a test. Customer got a 404? Write a test. Need to support IE 8? Write a test.

Next thing you know your team has hundreds of tests that do bunches of things. You also need a small super-computer cluster to run them as well.

The problem is that these end-to-end tests have serious inherent problems. Those problems with end-to-end tests are stability and speed.

Luckily, there is a solution. Let’s define the two problems first.

Lack of Test Stability is a Loss of Test Confidence

Let’s talk about stability first. I have worked on a number of projects where there is an automation test suite. We have our unit, integration, and end-to-end test tests. We usually have a continuous integration (CI) pipeline that will execute our tests on each check in. Things are great for the first couple of weeks. All steps are green and then after that we move to this:

Toy Car pile-up

And the failed builds are painful. Everything goes red and stop looking at the build. Then your team doesn’t care.

Roses are red, violets are red, everything is red

Then you start hearing these conversations:

The thing is though is that we still care about the first tests: unit. Why is that? Well because they are stable. We make git hooks that prevent people from pushing code to a broken build but our integration and end-to-end tests are still a total blood-bath. Below is a graph the depicts the stability of tests along with team confidence.

Graph of Test Stability and Team Confidence along with Number of Tests

One thing to think about. If your test environment works 99% of the time and you have 200+ tests, then you are statistically going to fail almost every build. The law of averages is NOT on your side. Even if you get a good build, how often will that happen?

Solutions to Complexity

First thought: Keep it simple. That seems to be like a obvious solution but try to get your team to focus on integrating the pieces that have the most complex interaction. If two parts connect in one way, then how much benefit do you get putting them together. If you have two units that interact back and forth, then integrate those together. More is not always better.

Second thought: Write a stub for the flakiest part of the system. Do you rely on that third-party processor and it works 80% of the time? Rip out the actual interaction into a stub! It may take a little time but it will make your tests reliable.

A real-world example: I was working on a project where we have a complex front-end web application and then a complex back-end that makes calls to multiple services. Past projects that were somewhat similar had always run into problems with the end-to-end tests where the back-end server would 500 or timeout (always randomly) and the tests would break. So we used sinon.js to fake XMLHttpRequests. You know what? That works 100% of the time. No weird delays, unexpected responses. The stubbing framework was < 200 lines of code and it opened us to up to write several tests on failure scenarios that are very, very difficult to recreate in a true end-to-end test.

Lack of Test Performance = “I don’t run those”

Developers are impatient. They are also easily distracted when they have to do something they don’t want to do. So when you have tests that don’t run quickly, then people don’t run them. One solution that I hear about the “nightly build”. I have never worked on a team that had this, but the problem is that you delay feedback to developers. Why!?! I want to know as quickly as possible that I broke something. First, I don’t want the shame of make a code change that breaks 500+ tests and then have to do the revert of shame.

Plus if you have the central authority run the tests, then your commit messages would look like this:

xkcd comit about git commit messages

So how do you make your tests run faster?

Well, there are a couple of things that can be done:

  • Choose frameworks that are made to be tested.
  • Break your large number of end-to-end tests down into integration tests.
  • If a framework has a long setup time, re-use your setup as much as possible.
  • Run your tests in parallel.

Integration Testing

Integration tests are interesting because we put together two or more units and verify that their effect and response is correct. An integration test may have more than one side-effect. If you have a user creation controller and a user service, when we test user creation, we send back to the user what their user name is with the controller but we will also verify that the service persists the user details.

Not everything can be integrated and tested. Look for frameworks that let you do this. I like AngularJS with their directives and new component architecture. I also love Spring. You can wire up all sorts of crazy configurations that let you test the interaction of beans. Databases now have DbUnit and Cassandra has CassandraUnit.

Integration tests are very unassuming. They seem like they are more complicated versions of unit tests. Plus, they don’t test the application end-to-end! But, they are fast and stable. When I say fast, I think less than 100ms. An integration tests mocks out the dependencies on the end. This allows the points of instability to become very very stable.

Lastly, integration tests let you build interesting scenarios. Are you worried about a race condition? You can build artificial dependencies that get injected into your integration test to verify how your system will perform. Want to know what happens when the system throws an exception on adding and item to the basket? No problem. Want to make sure that your message processor handles a rare out-of-order scenario? Not difficult.

It’s not the silver bullet, but when used with some end-to-end tests and a bedrock of unit tests; it helps tremendously.

Automating Efficiency

Setting up Intellij isn’t hard. Getting everyone on your team to do it is another thing. Getting it right so developers are efficient is no small matter. The little extra integration and goodness can really let people fly. Configured Intellij environments allow developers to get near real-time feedback on their work. Lisa Crispin talks about this in her blog about continuous integration and farming with donkeys:

If we have a continuous integration process that runs our regression tests on each new version of the code, we know within a few minutes or hours whether new or updated code has broken something. When we know right away, it’s easy to fix. Problems don’t worry us, because we know we can fix them in a timely manner and move on. Short feedback loops give us confidence. Confidence leads to enjoyment.

Source

While Lisa talks about minutes and hours, I think we should be thinking now in milliseconds and seconds for a feedback loop.

Setting up the Intellij Project

Let’s start with the project. Gradle has documentation here.

Below is an example idea configuration used in my base build.gradle file in the project. I’ll go into detail on what each of the different sections mean.

true

Looking at lines 7 and 8, there are two basic settings that can be set: the JDK level and the version control system. These are basic options in the idea plugin Source Being documented and pretty straight-forward, it’s not hard to understand what these do. Let’s move the crazier part.

Setting Annotation Processing

Line 10 is interesting because here, we are going to modify the XML. Intellij stores its project configuration in a .ipr file in the root project directory. So line 10 says “let’s modify that .ipr file.” The first block is where we find the node “CompilerConfiguration” and then modify the contents. We have to think of in-place changes because we don’t know the original state of the ipr file. So this block:

          // enable 'Annotation Processors'
           xmlFile.asNode().component.find {
               it.@name == 'CompilerConfiguration'
           }['annotationProcessing'][0].replaceNode {
               annotationProcessing {
                   profile(default: true, name: 'Default', useClasspath: 'true', enabled: true)
               }
           }

will produce the XML snippet:

<?xml version="1.0" encoding="UTF-8"?>
<project version="4">
 [...]
  <component name="CompilerConfiguration">
    <annotationProcessing>
      <profile default="true" name="Default" enabled="true">
        <processorPath useClasspath="true" />
      </profile>
    </annotationProcessing>
  </component>

We put this specific change in to automatically turn on annotation processing in Intellij. This allows the Lombok plugin to compile correctly in Intellij. You might ask “What’ lombok?”, well my friend, it makes POJOs into what I think that they should be.

Setting Git VCS root

Intellij made this interesting “feature” where when it knows that you are using Git, it wants to know where the root of the repository is set so it can properly track changes. In virtually every instance, it is the annoying popup in the top left where it asks you to set the VCS root. Then when you open the dialog, it has everything set and all you have to hit is “ok”. Well clicking buttons is annoying. So lines 21 to 26 do this for us. The gradle xml changes below:

      // setup Git root
      xmlFile.asNode().component.find { it.@name == 'VcsDirectoryMappings' }.replaceNode {
          component(name: 'VcsDirectoryMappings') {
              mapping(directory: "", vcs: "")
              mapping(directory: "\$PROJECT_DIR\$", vcs: 'Git')
          }
      }

will produce the XML snippet:

<?xml version="1.0" encoding="UTF-8"?>
<project version="4">

 [...]

   <component name="VcsDirectoryMappings">
     <mapping directory="$PROJECT_DIR$" vcs="Git" />
   </component>

Voilla!

Setting up the Intellij Module

In Intellij, “A module is a discrete unit of functionality that can be run, tested, and debugged independently.” Source. Here, we are going to use the idea plugin to setup our spring inspection and Infinitest setup.

As before, below is the gist of the project changes. We’ll go into details about what each line is.

true

The first thing to note is that we are going to be modifying the ‘.iml’ file in the project. This will allow us to modify which plugins will be active for the module. The idea plugin will allow us to write to this with lines: 7. The first thing that we do is get the “FacetManager” node. This node allows us to set which plugins are active in the module. Lines 10 through 17 are where we get the xml tag or build one.

The code below gets the facet manager node and then if it finds it, removes the web facet from it.

// Find or define the facetManager XML node.
def facetManager = xmlFile.asNode().component.find { it.@name == 'FacetManager' } as Node
  if (facetManager) {
    Node webFacet = facetManager.facet.find { it.@type == 'web' }
      if (webFacet)
          facetManager.remove(webFacet)
  } else {
      facetManager = xmlFile.asNode().appendNode('component', [name: 'FacetManager']);
  }

Next, in line 18 we are going to build our own elements so we can attach them. Lines 20 through 28 build the nodes for spring inpsection. Line 29 is where we attach that as a sub-element of the “FacetManager” element.

def builder = new NodeBuilder()

// Setup Spring Wiring inspection.
def springFacet = builder.facet(type: 'Spring', name: 'Spring') {
    configuration {
        fileset(id: 'fileset', name: 'Spring Application Context',  removed:'false') {
            file('file://$MODULE_DIR$/src/[PATH TO SPRING BOOT APP]/[SPRING BOOT APP CLASS].java'){
            }
        }
    }
}
facetManager.append springFacet

Lastly, still using the node build object, I build another xml element for Infinitest.

// Setup Infinitest integration.
def infinitestFacet = builder.facet(type: 'Infinitest', name: 'Infinitest') {
    configuration { }
}
facetManager.append infinitestFacet

Both of these produces the final output of:

<?xml version="1.0" encoding="UTF-8"?>
<module relativePaths="true" type="JAVA_MODULE" version="4">
  <component name="FacetManager">
    <facet type="Spring" name="Spring">
      <configuration>
        <fileset id="fileset" name="Spring Application Context" removed="false">
          <file>file://$MODULE_DIR$/src/[PATH TO SPRING BOOT APP]/[SPRING BOOT APP CLASS].java</file>
        </fileset>
      </configuration>
    </facet>
    <facet type="Infinitest" name="Infinitest">
      <configuration />
    </facet>
  </component>
  <!-- ... -->
</module>

So how do you add your own plugin configurations?

I do the following steps:

  1. Make a copy of your iml or ipr file.
  2. In Intellij, modify your settings to exactly what you want.
  3. Diff the two and determine what XML elements need to be created.
  4. Build the gradle configuration until you get exactly what you want.

Lastly: Is it worth the work?

If it’s just you, maybe not. I tend to work with teams of 3 - 15 developers. A good chunk of them are really great developers and many of them can get stuck trying to get things setup. Most developers are lazy (which isn’t always thought of as a bad thing) and so making things work “auto-magically” will result in the highest rate of adoption and the lowest rate of grumbling.

I am always open to hear your thoughts though…

There are two main ways to setup your project in Intellij when using gradle as your build tool for a java project:

  • Import your gradle project using Intellij.
  • Build your Intellij project using the Gradle idea plugin

Here, I’ll discuss the three approaches and the pros and cons. The end will talk about I do in the projects that I work on.

Import your Gradle project Using Intellij

Intellij has two big nice features: “ability to import projects from the existing Gradle models. So doing, IntelliJ IDEA downloads all the necessary dependencies” and “ability to synchronize structures of Gradle and IntelliJ IDEA projects.” In practice, this is where you open a project by selecting the “build.gradle” file in your project and the Intellij wizard(ry) does the rest.

Pros:

  • Very simple.
  • Changes are synchronized. As you change your build.gradle file, Intellij will automatically pull the dependency down and add it to your build path. Make sure that you select the check box as seen below for this feature.

Gradle import window in Intellij

Cons:

  • Intellij doesn’t import all of your settings. Specifically, if there are plugin configurations for your project that you use with your idea plugin settings

NOTE: JetBrains recommends that if you want to share your project settings on your team, that you should “.idea project configuration directory should be shared via version control.” Source and here but it contains a number of “guidelines” of things that you should not include because they “contain keystore passwords”, “conflicts if another developer has the same name”. I have also found when a project has these files checked in ( incorrectly albeit ), that every commit will inevitably contain some .iws change.

Build your Intellij project using the Gradle idea plugin

Gradle has an idea plugin that allows you to build your Intellij project files. You just need to include the line:

apply plugin: 'idea'

and when you run the command gradlew idea it will download your dependencies and setup your project.

Pros:

  • Very simple to setup dependencies.
  • You can customize project settings including your Version Control, JDK Version, and other plugin settings.

Cons:

  • Changes are not automatically synchronized. You need to run gradlew idea to rebuild your dependencies.
  • Making custom changes are not simple. Most of them involve XML manipulation using groovy.

So What Did I Choose?

I chose to use the second option. I found that even if the setup is harder, it’s worth it to automatically configure more parts of the development environment. We have strong developers that spend the time to get their environment just right. But, there are equally more people that will work with less optimal systems because they are unsure how to get it working.